
Brazil Online Visa for Indian Citizens: Your Complete Guide to a Smooth Application!
- EA FACTION
- Dec 22, 2025
- 4 min read

Dreaming of the vibrant streets of Rio, the majestic Amazon rainforest, or the stunning Iguazu Falls? Brazil is calling, and thanks to their new online visa system, getting there is easier than ever for Indian citizens! Say goodbye to tedious embassy visits and hello to a streamlined application process from the comfort of your home.
This blog post will walk you through everything you need to know about applying for your Brazil online visa, specifically tailored for Indian citizens. We'll cover the steps, essential documents, helpful tips, and even throw in some visual aids and video tutorials to make sure your application is a breeze.
Why the Online Visa is a Game-Changer
Previously, obtaining a Brazilian visa meant a trip to the embassy or consulate, piles of paperwork, and often long waiting times. The new e-Visa system has revolutionized this, offering:
Convenience: Apply from anywhere with an internet connection.
Speed: Faster processing times mean you can plan your trip with more flexibility.
Simplicity: A user-friendly online portal guides you through each step.
Step-by-Step Guide to Applying for Your Brazil Online Visa
Let's dive into the practicalities of getting your e-Visa!
Step 1: Gather Your Essential Documents
Before you even log on, make sure you have the following documents ready and scanned into digital format (PDF or JPEG, typically within specified size limits – check the official website for exact requirements).
Valid Passport: Your passport must be valid for at least six months beyond your intended date of entry into Brazil and have at least two blank pages. You'll need a clear scan of the biodata page.
Recent Passport-Sized Photograph: A digital photo adhering to standard passport photo requirements (white background, no shadows, face clearly visible).
Flight Itinerary: Proof of round-trip tickets or a confirmed itinerary showing your entry and exit dates from Brazil.
Hotel Reservation/Accommodation Proof: Confirmation of your hotel booking or a letter of invitation if staying with friends/family.
Bank Statement/Proof of Funds: Evidence that you have sufficient funds to cover your stay in Brazil. This could be recent bank statements (last 3-6 months).
Travel Itinerary (Optional but Recommended): A detailed plan of your activities in Brazil can strengthen your application.
Step 2: Access the Official Brazil e-Visa Portal
Navigate to the official Brazilian e-Visa website. Be very careful to use only the official government portal to avoid scams. A quick search for "Brazil e-Visa official" should lead you to the correct site.
Step 3: Create Your Account and Start the Application
Once on the portal, you'll likely need to create an account. This usually involves providing your email address and setting up a password. Once registered, you can begin your application.
Step 4: Fill Out the Application Form
This is where you'll input all your personal details, passport information, travel plans, and answer various questions about your trip. Take your time and ensure all information is accurate and matches your passport exactly.
Step 5: Upload Your Documents
You will be prompted to upload the digital copies of the documents you prepared in Step 1. Ensure each document is clear, legible, and meets the specified file size and format requirements.
Here's a sample of what a passport biodata page upload might look like:

And a sample of a digital photo upload:

Step 6: Pay the Visa Fee
After submitting your application and documents, you will be directed to a payment gateway. The visa fee is typically paid online using a credit or debit card. Make sure your card is enabled for international transactions.
Step 7: Submit and Wait for Approval
Once payment is confirmed, your application will be submitted for review. You will usually receive an email confirmation. Processing times can vary, but e-Visas are generally processed much faster than traditional visas. Keep an eye on your inbox!
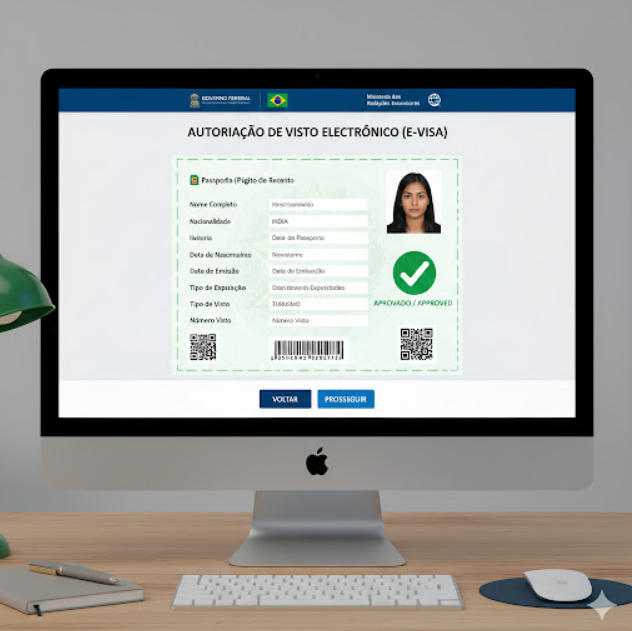
Here’s an example of what your e-visa might look like once approved:
Step 8: Print Your e-Visa
Once approved, you will receive your e-Visa via email. Print a copy of this document and keep it with your passport. You may need to present it to airline staff and immigration officers upon arrival in Brazil.
Checklist for Your Brazil Online Visa Application
Here’s a quick checklist to ensure you have everything covered:
Valid Passport (scanned biodata page)
Recent Passport-Sized Digital Photo
Round-trip Flight Itinerary
Hotel Reservations or Invitation Letter
Proof of Funds (Bank Statement)
Completed Online Application Form
Visa Fee Payment Confirmation
Printed Copy of Approved e-Visa
Helpful Video Tutorials
Sometimes, seeing is believing! While official tutorials might be limited, there are many helpful guides created by travelers that can give you a visual walkthrough. Here are some examples of what you might look for on YouTube
Important Tips for a Successful Application
Apply in Advance: While e-Visas are faster, it's always best to apply well in advance of your travel dates to account for any unforeseen delays.
Double-Check Everything: Any discrepancy between your application and your passport/documents can lead to delays or rejection.
Use the Official Website: Always ensure you are applying through the official Brazilian government e-Visa portal.
Keep Copies: Keep digital and physical copies of all your documents and the approved e-Visa.
Internet Connection: Ensure you have a stable internet connection throughout the application process to avoid interruptions.
Applying for a Brazil online visa from India is now a straightforward process designed to make your travel planning easier. By following these steps, gathering your documents carefully, and paying attention to detail, you'll be well on your way to experiencing the magic of Brazil. Boa viagem! (Have a good trip!)


Comments